Tuesday, December 13, 2022

Hardware Cost, Greed, Covid, Shipping, Crypto and Crazy

Somewhere some guy is waking up from a 5-year coma and saying he wants to get started PC gaming again. His friends exchange glances...


For the last 4 years, hardware prices have been insane. Years before when prices were relatively sane, top-end cards were $600-$700. The mid-range was $250-$350. Nvidia's 3060 is the 3000 generation's mid-range. Here's what recent history looks like...

MSI 3060 Ventus 3x

Zotac Gaming 3060Ti Twin Edge


EVGA 3060Ti FTW3 Ultra


The initial price of this graphics card from Nvidia was $330. This was released in February 2021. It's nearly 2 years later. I still can't find this reliably under $400 new. And what happened last year? How on earth did a $330 card garner a price four times higher than the MSRP?

You really cannot point to any one thing. 
  • Covid happened
  • General microchip shortage affected all industries
  • Shipping issues
  • Crypto-mining
  • Inflation
  • Good old corporate greed
These points will actually work in any areas where the cost has increased. Anyone saying one thing and one thing only is the cause of price increases is probably full of shit. If politics is involved, assume that's the default and move on. Of note, inflation really hasn't affected all things proportionately. 

Not ALL the issues were from the Ever Given being stuck in the suez canal, but it didn't help 😂


Here's what the MSRP for past mid-range cards looked like. A quick comparison to "high end", and an estimate of the "mid range". Take it with a grain of salt - They can price their GPUs any way they feel like. 


YearNvidia MidInitial CostNvidia HighInitial CostRatio high/low
2015GTX 960$200GTX 980$5492.745
2017GTX 1060$300GTX 1080$6002.000
2019GTX 2060$350GTX 2080$7002.000
2021GTX 3060$330GTX 3080$7002.121
2023GTX 4060???GTX 4080$1,200
high to low average2.217
estimated 4060 price$541


YearAMD MidInitial CostAMD HighInitial CostRatio high/low
2015RX 480$200--
2017RX 580$230Vega 64$5002.174
2019RX 5600$280RX 5700 XT$4001.429
2021RX 6600$330RX 6800$5801.758
2023RX 7600???RX 7900 XT$900
high to low average1.787
estimated 7600 price$504


**to be fair, I'm using the Radeon 7900 which is technically above the "high tier" 7800 - but that's only because there is no 7800 yet, AMD decided 2 new extreme tier 7900 versions was a better idea...

Shortly into the 1060/580 release, crypto-mining took off and prices skyrocketed. I got "lucky" getting a 1060 3GB (yuck) for $300. The MSRPs for the Nvidia 20 series and AMD 5000 series were like a practical joke. Cost only really started dropping recently with the change of a major cryptocurrency (Etherium) moving to "proof-of-stake". This had security and validation in mind for the cryptocurrency but mining was no longer profitable (yay). Do note, the crypto-market is in freefall. Unsure if this is simply compounded by moves like that.

So today (end of 2022), there's a flood of second-hand cards for sale. A card from 2 years ago selling second-hand for over the initial MSRP is ridiculous - yet, that's the rule.

At this point, looking at amazon, the 3060 is going for $370 at least, with most over $400. This seems to be "normal" for Nvidia's product line. The 3080 is $800-$1400, and the 3090 is $1400-$1900.

The AMD 6600 is going for as low as $230 - from several vendors. The 3060 is faster overall but it's not huge. Lower single-digit percent change there. Ray tracing makes a bigger difference between the two, but for a lot of people, these cards won't be effective ray-tracing cards anyway. The rest of AMD's product stack is similar, where matching price with Nvidia results in much higher performance levels - up to the point where AMD's cards hit their limit. The XFX 6900 XT is available from $650 now and is about parity with Nvidia's 3080 - not the 3080 OC or Ti or other variants.

Perhaps this performance advantage led to Nvidia making a massive space heater of a GPU which necessitated a new power delivery plug (there were fires!). Maybe their thinking was they should get so far ahead of the competition that it would hurt them. They set an MSRP for this insanity at $1600, and prices soared - the "Founders Edition" hit $3350. The Nvidia store is selling this monstrosity for $2450 now, so they're quite complicit with scalpers. They introduced a cheaper version of the card - a 4080 - MSRP of $1200. These prices have gone full crazy now. Normally you pay a premium to get a little more speed, but now you're getting much less with the "lower-end" card. Simply put, the drop in price is less than the drop in performance, making the 4090 a "better buy". This is how a company tries to milk its customers.

AMD's next generation part to compete with the 4000 series is the 7900xtx and 7900xt. The 7900xtx can compare with the 4080 (perhaps not with raytracing) and the MSRP comes in at $1000. OK - that's still well above what the high-end used to cost. The 7900xt is $900. Lose 10% of the cost, and about 17% the speed - a worse buy? A page from Nvidia's playbook?

In the past, the high-end was about double the cost of the mid-tier. If the high end is going for $1600, we may just see ludicrous MSRP pricing at the mid-tier, even before price gouging, scalping, etc.

Bottom line? Prices are still crazy, and the companies making the cards are setting nonsense prices to goad users into spending for top-tier GPUs. The habit of not producing mid-range cards as well to push customers to buy the high-end is relatively recent. It's been happening for several years, but that's only the last few product lines. How do we get around it? Jump ship. AMD's prices are more reasonable even if they are trying the same thing. 

The new GPUs are priced so high, the old GPUs aren't going to drop in cost until mid-range models come out - and only if mid-range GPUs are given mid-range prices. It doesn't feel like an improvement over the last generation, but an expensive extension of it.

Buy older higher tier cards until the cost drops. Get second-hand cards if you can trust the seller. Hit them where it hurts. Hit their wallets.

Addendum - another thought: We're paying for a feature that we just weren't quite ready for. We have 4k monitors and we have fast refresh-rate monitors. But we barely have graphics cards that can do both with ray tracing turned on. Even current budget cards will give us excellent frame rates at 2560x1440. But if a $600 graphics card is struggling to do that with ray tracing turned on (maybe not in all games) maybe that feature is a little beyond common mainstream. No one should be paying $1000+ for gaming hardware that would be outdated in a few years. GPUs shouldn't brute force their way into getting something done expending this much power and heat.

Sunday, March 27, 2022

Headphones 3 : Moar!

Heavy modding:

 I've been quite pleased with my headphones so far. Especially those I've made using titanium drivers. I had a relatively high-quality "tesla" driver available that I believe is even higher quality than the last "tesla" driver I used. The outer casing is anodized metal. 


Hmm, what shall I do with this one? I do have a rather ragged Symphonized headset...

My next pair of headphones is now obvious. I've always liked the build quality of this headset. It's not really solid metal. it's not really thick,  and there's plastic in the cup's walls. That said, the headband, the sliding mechanism, and stirrup are all steel, and have decent flex. It's not something I'd worry about being unable to take a beating. The main reason I used this headset over my others in the past, was comfort - not sound quality.


Let's Build!

I started with my pair minus the torn earpads. 

I've had this a few years, and it still looks great. Time to make this muffled mess sound better 😁

I twisted it to display the speaker side. I'm removing that entire baffle, and of course, replacing the speaker. I'll use a larger plastic baffle for a bigger more comfortable pad too.


Sticking with Kydex. Easy to cut, and I like the patterned finish I get on the sheets. Durable as hell too.


I started by measuring the diagonal of the 4 holes. I drew a circle on the baffle I cut using that as the diameter. Next, I clamped the original baffle down so that I could see the drawn circle on the new baffle through all 4 holes. With that, it was aligned. I drilled the 4 holes that would bolt this new baffle to the cup.


Now that I have the baffle that bolts to the cup, I need to attach the speakers. I drew another circle, 50mm in diameter, and used that to estimate where I'd drill 4 more holes.


After drilling holes to fasten the speaker, I needed to either drill a big hole and fasten a speaker grill, or fashion my own. I opted for the latter, drilling out a pattern within the 50mm circle's perimeter.


I turned my attention to the cups now. I could leave this closed-back, but from all the drivers I've used, it just seems that sound fidelity suffers this way. I could always reduce the hole's effect covering up from inside, so wanting to go back to "closed" remains an option.


The original baffle was used as a screw template. Now I'm, scavenging the foam it used as a sound filter to cover the cup's holes from the inside, where it will serve as a dust filter.


Foam covered the holes nicely.


I fastened the speaker to the baffle in the usual way. 3d-pen makes that easy. The receptacle however gets in the way of the plastic inside the cup. I simply removed the plastic getting in my way, grinding it out using a rotary tool.


It's a rough cut, but that doesn't matter. The speaker can now fit.


Finally, bolted on the baffles and added the pads. everything looks quite clean!


Sound?

The sound is far improved. My usual tests (described at the end of my first DIY-Headphone article) were handled quite well. From hearing the seagulls in "Faded",  the triangles in "The Trio" to the creaking of piano keys in "Mad World". The details are all there. Somewhat more nuanced than the titanium driver in my second article provided, but the bass is thicker, fuller. These headphones appear easier to drive too, picking up higher volumes than my last pair. Chuck Mangione "Feels so good"? It sounded so good too 😉


Final Thoughts...

Comparing this with my previous builds (first, second), it may be not only simpler to use these headphones as a base, but also cheaper. They can sell for ~$35 as refurbished. That gets a good build quality headband and stirrups, cups, jacks, and cable with an in-line mic. I also value my time. I did this in an afternoon. I didn't have to wait for the glue to dry and paint to finish. I'm definitely considering this option again for future builds.


Saturday, March 19, 2022

Headphones: Part Two!

Modifications to the original and other projects:

Since making headphones in my last foray, I've swapped out the pads, added headband padding, and thoroughly enjoyed them. I've also given them to my biggest fan - my daughter 😉. Then I made 2 more and gave them to my brothers' in law.


Mark III - Wool diaphragm drivers in these. I removed the paper backing, and with the 3 holes on the cups, these are bass cannons. Clarity isn't great, but it's better than my old Razer headphones. The olive wood cups are beautiful and strong. Have to redo these with better speakers sometime. I should note - The headband is from a noise protection headset. It's light and durable - but barely long enough for my head. The noise protector with a plastic headband and thin metal stirrups as I used in my previous set are more adjustable and more comfortable. I'd wager this is more durable though, and for smaller heads would also be more comfortable.


Mark IV - These cups are beechwood. I was more conservative with the paper backing removal, exposing only a single hole in each driver. The interesting bit about these is that each side has 2 speakers, for a total of 4. Each side has a titanium diaphragm driver and a composite driver from a JBL club. The wool driver went in at a bit of an angle slightly behind the titanium driver with the intent being that dips in the frequency response of one driver would be catered for by the other driver. Clarity on these absolutely floored me. I'm didn't measure anything, but there were times while listening to music with these that I'd pause and try my previously made headsets. Could I what I heard on those? Why did it stand out? I'd flip back and forth listening wondering which was cleaner. The headband on these was from a racing headset. It's butch - made to last, yet quite configurable. I used a couple headband bands to cover up the headband and make it neater and more comfortable.


Getting serious on Mark V:

I really liked the dual diver setup on the Mark IV. After finding sources for cheap speakers off eBay, AliExpress, and earphonediylabs.com I had several options for my next (several) headphones. 

The titanium 50mm diaphragms were always pleasing. I tried several other options bare before settling on some "Tesla" type secondary drivers. Beyerdynamic's higher-end units are advertised as using Tesla drivers. A Tesla driver is a driver where the magnetic field strength of the air gap the voice coil moves along in exceeds 1 Tesla. A Tesla is the unit of measurement for magnetic field strength.

I decided to stick to a similar layout as the Mark IV. slightly off-center titanium driver and angled secondary driver.


So nice of the shipper to add a protective speaker grill for the 50mm titanium driver. The claim for most of these is that they are replacements for or directly from AKG 371 headphones. Maybe they are? I've no way to test. They do sound fantastic though!


Measure twice cut once. Sticking with Kydex to hold my speakers. I used my soldering iron to burn a hole in the paper backing for the titanium driver.


I used the 3D pen again to hold the speakers in place. The angled speaker does not rest against the 50mm. If it did, then the diaphragm would probably rattle against it at loud volumes. With the 3D pen, I was able to hold it off the speaker and "draw" some support in place before moving onto the rest of the receptacle.


I think the final result looked fantastic. The speakers won't budge from there or rattle. The carbon fiber texture looks great, and those speaker grills just fit flush in the holes I cut with the scroll saw.


The headband is a DIY replacement from AliExpress. I used the same beechwood cups I used in the previous 4-speaker headphones because it's large enough to hold the speakers. So large, I didn't really have space to pass the cable through the top, so instead, it's coming from the sides. The 3.5mm unbalanced jack is not dead center, but slightly forwards. This way the jack isn't constantly hitting my shoulder when I move my head. With cups this large, it's difficult to find pads. These are generic 110mm pads, stretched to fit over the 113mm discs. If I were to build these again, I'd make the cups a bit deeper. The cable is knotted inside to prevent it from being pulled externally and breaking a solder joint. That knot barely fits with the speaker in the available space. The angle also helps with the V-Moda boom mic positioning.

Up till now, I've been making all my headphones use unbalanced jacks. I'll have to try a split balanced cable next time. I doubt I can hear a difference, but it will make design a little easier without having the overhead cable to worry about.

I did end up opening this up and opening another hole in the titanium paper backing, and 2 on the tesla speakers to increase bass response. Satisfied for now 😊


Tuesday, January 18, 2022

Making my own headphones


Make what?

I decided to make my own headphones. I came across the drivers on ebay while looking for some replacement headphones. It seems in general - great sound, great build quality, low cost - pick any two.

I am not an audiophile, nor do I have high end audio gear. My main listening devices are my PC with a iFi Zen DAC. For exercise, I use my phone with a Qudelix-5K bluetooth DAC. These are easily adequate, but in no way represent "high end" audio equipment.

But...why make headphones?

I started to appreciate decent audio quality when my Razer Kraken died. I picked up a Philips Fidelio L2 and V-Moda cable+headset mic as a replacement. The Razer had extremely solid build quality. Good use of metal. I complained about the non-detachable cable as a weakness on their forum and a rep contacted me and even sent a replacement. I cannot fault their customer service. 
    The Philips however had wonderful clean tuning. Bass, mids and highs were all present. Nothing felt like it dipped too low. It was clearer than my Razer too. The build quality was OK. Lot of metal, but I think there's a couple weak points. I still have it, so it lasts. Comfort was missing in one area - the headband pressed in a small area at the top of my head. Why did it sound better? Driver? Pads? something about the way it let sound out with the semi-open nature?
    So I looked around, adamant that I'll buy something more comfortable with good build quality after a particularly long call. The top of my head was smarting - I swear I could feel a dent 😛. I came across the Symphonized Wraith 2.0. It was relatively cheap, but used good materials. Metal brackets, headband. the extension mechanism was also metal. The cups used plastic and wood. It was comfortable to the top of my head, but had horrible pads. It didn't sound great.


    By now I understood from numerous reviews and youtube research (that's a potentially painful phrase, but honestly makes more sense than it should) that I can change the sound with some mods. I bought a couple types of pads. Plain leather didn't sound much better, but the headphones at least weren't resting on my ears. The next up were fenestrated pads - pads with perforations. The sound had changed dramatically better. Probably still not as good as the Philips, but close. So much more comfortable though. If I were to guess, when the speaker diaphragm moves, it creates pressure changes. If air on either side of the diaphragm has nowhere to go, then the pressure builds up - between the speaker and headphone cup, or between the speaker and your ear. I believe the perforations on the fenestrated pad lets the air move more freely between the speaker and ear letting the diaphragm move easier.


IEMs were next!

In my quest for bang for buck audio, it was hard not to try some in-ear monitors. I.e. the little earphones that enter your ear canal.
  • KZ zs10 pro - I was wowed by the sound and price. I picked this up because I needed a small headset to work with from my phone. This really surprised me. Strong bass, and good mids. Highs were nice - lower than others. This was good in a way - it gets tiresome listening to shrill noises after a while. It did lack detail though.
  • Tin Audio T2 - The KZ brought a comfortable listening experience. The Tin Audio T2 brought more detail than I was accustomed to. The weak point here was a lack of lower bass. Everything was wonderfully detailed. This is considered a neutral sound from online reviews.
  • Shuoer Tape - I had finally decided to spend a little more on these. When you're buying small IEMs, you think to yourself you shouldn't spend much on them, but it's really worth it. These had a nice bass kick and extreme detail. It's just really shrill at times. Some songs would feel harsh. This was somewhat mitigated by using Shure tips with a narrow opening, but this costs a little of that extreme detail.
  • KZ ZSX - Can be uncomfortable, but a nice "v" shaped tuning that stresses the bass and elevates some highs. Details were probably not as good as the T2 and the mids weren't as well represented as the highs and bass, but this took my top spot for a time.
  • Etymotic ER3XR - I bought these because it was on a really steep discount. Honestly one of the most detailed IEMs I've ever used, but it's too uncomfortable for me to appreciate it.
  • Fiio FH3 - this is my current goto. This uses a beryllium plated diaphragm providing substantial bass. 2 Balanced armatures provide more mid/highs. Balanced armatures are quicker to react than a diaphragm, so they can provide more detail in general. A diaphragm moves more air, so it provides better bass normally. By coating the diaphragm in beryllium, it's stiffer and can react to the rapid movements of the coil better. The result isn't just good bass, but details that I wouldn't notice with anything but the Etymotic. These had a nice slight V shaped emphasis on the bass and treble.

By this point, my IEM's sound far surpassed my over-ear headphones. Over-ear does provide a nice feel to the music. Ever stand next to a speaker and feel the music with your body? An over-ear accomplishes this to a much smaller degree. You're  not going to feel it on every song, but when you do (on your face not your body :P), you'll look at your stash of IEMs, and wistfully wish they could do this too. Instruments and sounds also seem to come from further away. This helps with interpreting where the sound is coming from. Finally I don't trust listening to music using IEMs constantly. I believe that being this close to my eardrum, it's more likely to affect my hearing. Yeah, something I noticed on these headphones forums was the number of people that would complain, question or meme about tinnitus

Where am I going with this?

So after experiencing aural bliss with the FH3 but wishing it were over-ear, I figured it was time to make my own headphones. I had been seeing replacement drivers for several makes of headphones online - even higher end units like the titanium driver in the AKG 371. They weren't too expensive either. So well why not ¯\_(ツ)_/¯

The build!

I started with some Bamboo containers. These are meant to hold cooking spices. They were definitely too deep to use directly. I used a rotary cutting tool and my clamp as a jig to maintain a specific depth as I cut it down to size.


In the process, flaws in the bamboo container caused the bottom of one to fall out, and a split along the side. This was resolved with copious amounts of wood glue and a couple clamps. I ended up coating the insides of both cups hoping it would increase the strength of each.


Next up drilling holes. I cut out a cardboard circle with some holes as a template for where to drill. The same template was used to get holes made on plastic discs, cut to 107mm diameter. This size produced enough of a lip to squeeze 105/110mm pads over. Plastic used was kydex. It's tough and used in knife sheaths. I had olive wood cups I started working on as well as a secondary set.


The cups were sanded. The glued cup needed some in particular. 4 holes from back to front to clamp down the plastic disc to the bamboo cup. 2 on the sides which will bolt the cup to the headband. One on the top for the wires connecting left and right cups. One on the bottom for the female jack. I put a female jack on both cups - You can plug into either one, or even connect a second headphone. A light varnish coating was applied to protect the bamboo.


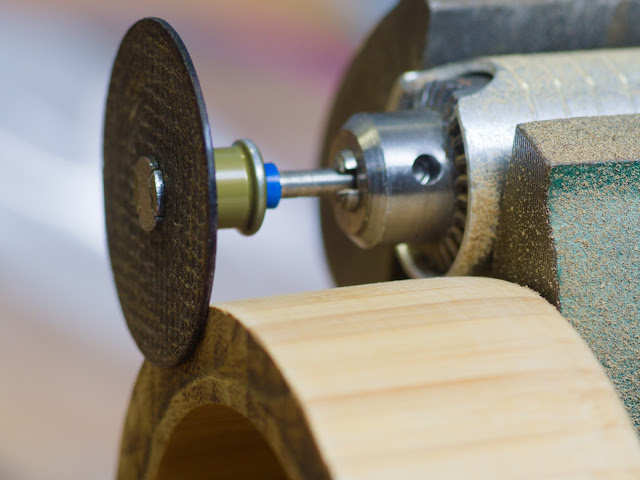
For the discs, my plan was the speaker would attach directly. For this, I traced out the speaker, and drilled 4 holes around the outline.


M2.5 screws and a small nut through each hole acted as anchors for the speaker. A 3d pen was used to "draw" the bracket in place around the speaker.


With the speaker secured, it's time to look at the grille. Here's a shot of that titanium goodness.


To connect the left and right cups, I needed 3 wires. I didn't have anything premade, so I sacrificed a power cable. Stripping away the outer insulation left the inner wires. I plaited the wires with the ends clamped. This way it would neatly carry the signal needed between the cups.


Here's a view of the cups wired to the jack. The black wire connects the central prong of the jack. The white and green connect to left and right prongs respectively. The red/black wires for each cup connect to white/black and green/black for the left and white cups. I mentioned using copious amounts of glue. Well, there you can see it. The red glop is liquid tape. It's convenient. Gets in there to cover the contacts so nothing accidentally shorts out the headphones.


Once the glue and goop are dry, it's time to add hardware, then foam. Foam dampens sound - absorbs the pressure wave, stopping sound from reflecting off the back of the cup. I'm using safety earmuffs for the headband, and it also comes with foam. These are cheap and quite sturdy, making this pretty effective.


Once the speakers were soldered to the red/black cables, I experimented with the screw/nut combination that would leave enough screw outside the cup to bolt on to the headband. I used 4 thumbscrews for each cup. On either side of the cup, one thumbscrew secured the bolt to the cup, and another tightened down on that. The narrow end of the thumbscrews formed a nice saddle for the headband to pivot off of. With that over, the foam can be stuffed in the cup.


Looking good so far. I kept testing the sound using a generic "left right speaker test" I searched for on youtube. I used 45mm screws to bolt the red plastic disks from before to the cup. The bolt held the speaker grille down against the disk as well. A non slip nut holds it from the other end, and this was topped off using an acorn nut to keep it smooth.


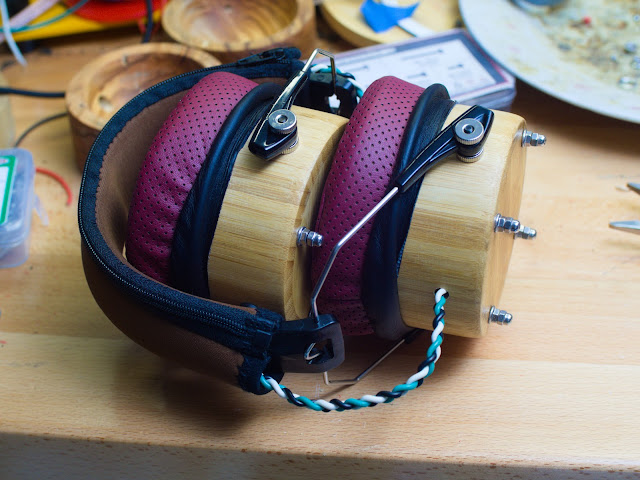
The final piece was the headband. The brackets were bolted to the cups already, so this part just snaps in place. I used a headband pad to pass the wire through and make it more presentable.


Here's a view on my head. The clamping pressure of the headband is higher than regular headphones. I'll be experimenting with a hot-air gun to see if I can make it a bit more relaxed. I'm really enjoying the sound though. Did I accomplish my goal? Maybe. It's definitely beyond my Philips and modified Symphonized headphones. Details are crystal clear, and I'll have to really compare my Fh3 closely to determine which one has more - so that is a big win already. I can hear positions better. Nothing is lacking, and treble isn't pressing into painful levels.

Some tracks I've been testing with.
  • Massive Attack - "Angel" and "Teardrop". Bass heavy tracks. Test here is if it's substantial while providing detail.
  • Ennio Morricone - "The Good, The Bad and The Ugly" soundtrack, "The Ecstasy of Gold" and "The Trio". This is my treble test. Both have points that can bring out painful shell noise, or smooth sweet highs. Note the vocals in "Ecstasy" and trumpet in "The Trio". If the female vocals aren't enough of a stress test for your earpiece, the trumpet may be. Playing those without painful shrill noise, but sweet highs is an accomplishment. There's a lot of instruments at the end of "Ecstasy" making it a decent test, being able to pick out the different instruments. A lot of potential there to produce a cacophony. 
  • Chuck Mangione - "Feels So Good", Dave Brubeck Quartet - "Take Five". Instrumental jazz provides solid range in tone and harmonics in the notes, testing range and clarity, instrument separation, position etc.
  • My brother gave me this one. Alan Walker - "Faded". Listen for the seagulls at the start and end. Decent test for sensitivity and detail.