Tuesday, September 12, 2023

Analyzing my lens choices

So, I took a trip...

I don't take long trips away often. So when I do, I have to seize the opportunity. I was heading to Canada on a cruise. My travel budget (both $$ and lbs) lent a generous portion of itself to photography. The then, is "What lens to take?". 


And I took some lenses...

I have a decent collection of micro four-thirds glass, and a fair number of adapted lenses too. My breakdown for what I took:
  • Panasonic 12-60mm F3.5-5.6: Solid general zoom lens. Great in bright light. Quite wide for a kit zoom.
  • Olympus 75-300mm F4.8-6.7: My long zoom. Possibility of birds, whales, and other wildlife - this definitely gets in my bag. The lens also provides certain background compression opportunities. e.g. Taking a picture of someone with a far-off object in the background, taking up most of the picture.
  • Sigma 16mm F1.4: I've been loving this lens a lot lately. It's a 32mm equivalent, which is sort of a "wide-normal" focal length. It's bright - so it's great for indoors.
  • Samyang 50mm F1.4 + Metabones Focal Reducer: As a 35mm F1.0 lens, this is still my favorite portrait combo on M43. I wasn't expecting to use this much - but just in case.
  • 7Artisians 7.5mm F2.8 Fisheye: Another manual lens. this fisheye gave me some of the best pictures of the last holiday. When you cannot get a wide enough view, this works wonders.
  • Panasonic 20mm F1.7: Both my wife and daughter carried their Olympus E-M10 I and III cameras with version I and II of this lens. It's a nice pancake with excellent sharpness.

Analyze photos with exiftool and WSL:

I used exiftool to check image information. Windows Subsystem for Linux is one of the few things that keeps me with a Windows box still. 

Install exiftool (WSL/debian/ubuntu):
sudo apt install libimage-exiftool-perl

Usage:
exiftool yourimage

I wanted output I could parse easier, so
exiftool -json yourimage

e.g.

So... many... fields!!!
I really just want the lens and focal length fields.

$ exiftool -json PRJC5662.JPG  | jq -c "{Lens:.[].LensID,FL:.[].FocalLength}"
{"Lens":"LUMIX G VARIO 12-60mm F3.5-5.6","FL":"15.0 mm"}


Next step - dump just the specifics on each file - lens and focal length.


#!/bin/bash
origdir="/mnt/d/library/htdocs/Pics/2023" #Parent folder of image folders
#iterate across all subfolders needed
for folder in "08/24" "08/25" "08/26" "08/27" "08/28" "08/29" "08/30" "08/31" "09/01" "09/02"; do
  cd $origdir
  cd $folder
  alljpegs=`find . | grep -i "jpg$"`
  for afile in $alljpegs; do
    bfile=`basename $afile`
    ffile="${origdir}/${folder}/${bfile}"
    exifdt=`exiftool -json $afile  | jq -c "{File:\"$ffile\",Lens:.[].LensID,FL:.[].FocalLength}"`
    echo "$exifdt"
  done
done | tee ./lensinfo.json

This produces leninfo.txt, where I can just grep the information, and pipe the output to wc to count matching lines.

The output looks like this:
{"File":"/mnt/d/library/htdocs/Pics/2023/08/24/08/24/LLC10011.JPG","Lens":"Lumix G 20mm F1.7 Asph.","FL":"20.0 mm"}
{"File":"/mnt/d/library/htdocs/Pics/2023/08/24/08/24/PRJC4306.JPG","Lens":"SIGMA 16mm F1.4 DC DN | C 017","FL":"16.0 mm"}
{"File":"/mnt/d/library/htdocs/Pics/2023/08/24/08/24/PRJC4308.JPG","Lens":null,"FL":"0.0 mm"}

For example - If I want to know how many pictures were taken with the Sigma 16mm lens:
$ ∙ cat lensinfo.txt  | grep "SIGMA 16" | wc -l
311


Manual lenses are the reduced 50mm F1.4 (35mm F1.0) and fisheye.
I need to visually determine these.

A quick loop is all that's needed - I copied photos with manual glass to a temp folder, and just dragged photos that looked like non-fisheye to another.

mf_fh="${HOME}/scripts/photag/mf/fh/"
while read -r line; do
  if [[ "$line" == *"Lens\":null"* ]]; then
    fname=`echo "$line" | jq -r ".File"`
    cp "$fname" "$mf_fh" &&echo "copied $line"
  fi;
done <<< `cat ./lensinfo.json`


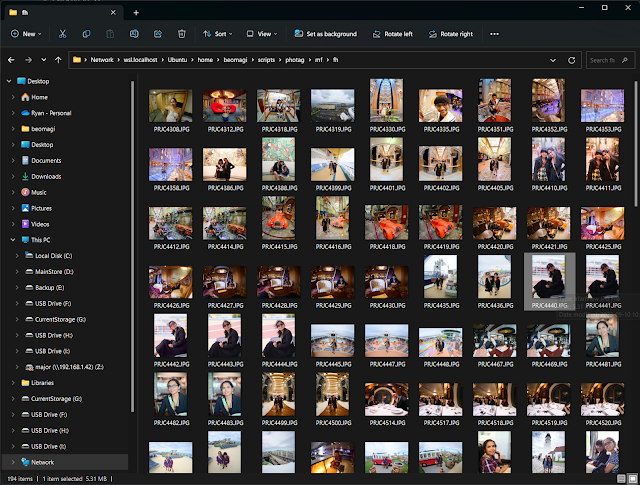
That dropped maybe 200 files into the fisheye folder. I barely used my 50mm so should be quick.


Out of ~200 photos, 15 were shot with the 50mm and 179 with the fisheye.

Lens use tally:
LensCount
Sigma 16mm311
50mm F1.4 + MB15
75-300mm284
12-60mm384
7Artisians FE179
Super Wife952
Awesome Kid120


But.... This was just an initial check - how many of these are keepers? Some may not be great. Burst shooting was used for a few. These pics are informal for my family, so I'm being less stringent on what I remove.  What does the final tally look like?

LensCountKeeper Rate
Sigma 16mm22572.35%
50mm F1.4 + MB1066.67%
75-300mm26593.31%
12-60mm30178.39%
7Artisians FE11664.80%
Super Wife75679.41%
Awesome Kid7965.83%


How often I used a particular lens:


Shooting patterns:

Well right off the bat I can see that if there's any lens I leave behind on a scenic trip, it's the 50mm F1.4 + MB reducer. It's a great lens. A favorite. It just obliterates the background. If the objective of the photo is to capture the subject (people) with the surroundings, it's not the right lens for the job. Nice render though 😁

I love the way this lens renders bokeh. I can stop down for the background, but at that point, I'll just use the regular zoom.


Of my own pictures, the 7Artisians Fisheye was the next least used (still significantly used over the 50 though!) - but it also gave some of the most impactful pictures! It will capture the sweeping curves of the cruise ship's structures, or just deliver a perspective otherwise impossible to capture. The image can be fully defished to give a wide rectilinear result, or slightly to keep a bit of that distortion.

A spiraling staircase led from the 3rd floor to the 5th. Keep subjects near the center of the frame and step back. This keeps them from getting too distorted. 


the fisheye also fares well in the ship's main dining room.


Sometimes you just want pictures with tall buildings, statues, and monuments - and it feels impossible with most lenses. Without being able to step back a lot, the 7Artisians Fisheye was able to capture the top of the lighthouse.


When you want all the sky...


Sometimes you just want more width and a consistent hyperfocal distance that puts everything in focus.


Being close to the ship wasn't a problem. I did slightly defish the image.

Photography on a ship can be tough with unforgiving lighting conditions. Lights come at bad angles casting shadows on faces. Lights from different areas have different colors making white balance tough. A fisheye captures so much, that it's even tougher to balance exposure and color.


Next up, is the 12-60mm lens. I went into this not realizing how much I'd use it. I barely used this lens when on the ship. Out in the sun during the day, however, it was really effective.

Arcadia National Park, Jordon Pond


Cape Elizabeth, Portland Head Light


Nova Scotia,Peggy's Cove Lighthouse


Strength of a zoom, is in composition and framing. I took this from a bridge in Concord. I saw the boathouse through a gap in the trees. The kayakers were a welcome addition.

The 12-60mm isn't a macro lens, but it can give a respectable close focus in a pinch when desired. With an achromatic close-up filter, it does have fair macro capability.


The Olympus 75-300mm is a long zoom. It's good for wildlife, far-off structures, and even for portraits where you want to have something in the distance fill the background.


I didn't see any whales, puffins, or other wildlife. Birds seem to like flying by cruise ships though. I guess they use the rising warm air as a pick-me-up.


We passed the Cape Elizabeth lighthouse while pulling out of Portland. At 156mm (312mm effective in full-frame terms) It fills the available space in the background. 


The Sigma 16mm is fast becoming a favorite of mine. The F1.4 aperture is nice and bright for indoors and at night. It's somewhat wide, giving a decent depth of field. Sharp, flare-resistant etc... It's a good lens. A little big though, especially compared to the competition - a 15mm F1.4 Panasonic and 17mm F1.8 OM. It is cheaper though, and doesn't seem to sacrifice image quality. 

Night on a cruise ship is generally quite dark. It certainly wasn't this bright. Faces are perpetually ill-lit, with multiple light colors to make post-processing a pain.


The arcade is one of the darker areas on the ship. A bright F1.4 lens really shines here - especially if it's wide enough to capture more.


It's a fast lens - but that doesn't mean it's useless in bright light. You can stop down - or just let it rip and enjoy a bit of background blur.


The 16mm F1.4 gives a 32mm effective focal length on Micro Four thirds. It's a nice wide-normal type field of view, making it really comfortable to use indoors.

It was a cruise - it won't be complete without a food pic 😁. Last night of the cruise - Lamb and vegetables.


Final thoughts...

If I had to use one lens, it would easily be the Sigma 16mm F1.4. It doesn't have to specifically be this lens - the 15mm Panasonic and 17mm Olympus are also great options for normal-wide type primes. The ability to shoot in dark areas is great. I didn't bother to take it outside, because I had the 12-60mm zoom - but it would fare well outside too, just stopped down. It wouldn't have the versatility of the 12-60mm of course.

Why doesn't this apply to the 50mm? Well, 50mm on the micro four-thirds platform is an effective 100mm. It's too narrow a field of view, making it rather restrictive. The reducer makes it 35mm - but that's still too narrow.

The next lens in my arsenal I wouldn't go without is the fisheye. I used the zooms far more than this lens, but I was really pleased with the standout fisheye results.

Other than the 50mm F1.4 (35mm F1) that I could definitely do without, what else would I probably drop? It might be the 75-300mm. I got some great shots with it, and there's always the possibility of wildlife where I just need that range - but nothing really stood out this time. Perhaps a better idea would be a superzoom lens - Olympus has a 12-200mm superzoom (though costly!). Tamron has a 14-150mm that has decent sharpness (and it's cheap too).


How do you carry what you need comfortably? Get a decent bag. A small sling is fine for light loads. Get a proper backpack when it starts getting heavy.

5 Lenses, the Panasonic G9 Camera, a 360 cam, tripod, spare cards, adapters, wipes, my laptop, tablet, chargers, snacks, passports etc. all fit in this bag. A Tarion Pro backpack. If you want to carry 2 cameras, or even 2 systems and a laptop, this will do this very nicely. On the ship I used my Domke F-802 "reporter's satchel" - seen rolled up and being carried by the Tarion in the rear straps.


Tuesday, May 23, 2023

A bevy of Vintage 50s and focal reducers

This article may not be for you...

Disclaimer about sharpness. The question of sharpness and 50s isn't new. I've seen a lot of photographers knock the idea of pixel peeping, and responses like "Just stop down!" or "Why shoot wide open?" or "Stop chasing sharpness." 

Well, to each their own, but It's still an important aspect of photography to me. I like seeing that critical focus on that part of the subject that I want in focus. Sure, I'm not going to use max aperture on everything - but when I do, I still want a crisp subject in my isolation. 

Why am I using old lenses?

Since the dawn of the camera, gear nerds have always had G.A.S. Gear Acquisition Syndrome. 
It's the insatiable desire for better IQ, more bokeh, faster lenses, longer wider etc.
Over the years I've accumulated a large collection of vintage glass.


I started micro-four-thirds with an E-PL1 and Panasonic Leica 25mm F1.4. I really liked this combination. Micro-four-thirds was new at the time. The problem with any new camera system though - there aren't many lenses for it. I adapted a four-thirds fast zoom, but I really liked primes. The sensor was a bit lackluster at higher ISO. It's not just about sensor size, but also about development. It's 68% the size of Canon's APS-C sensor, but Canon handled high iso a lot better than the size difference suggested.

Then I saw that mirrorless with a low flange distance could adapt lenses. Behold! Cheap fast primes were suddenly available. DSLR lenses, range finder lenses, c-mount...

Mirrorless cameras today are like digital-backs for older lenses. The crop of the micro-four-thirds sensor meant every lens was effectively longer. Were they any good? Sure. Maybe not wide open, some lemons, some degraded with time, some had nice character - some too much! This moon was shot with the $40 Vivitar 400mm with a cheap Vivitar teleconverter. I thought this was spectacular. 


Vintage glass was also a cheap solution for macros.

And vintage glass could be fast! As fast as F1.2 without getting too expensive. My most expensive glass was the Nikon 50mm F1.2 ($375) and Canon FD 55mm F1.2 SSC ($271). Compare this to the Canon EOS 50mm F1.2 L which was $1300 - perhaps $1000 used.

I did want to try a full-frame look with these lenses. I got the Canon FD 55mm F1.2 SSC first. I replaced the FD mount with an EF mount conversion kit. Being successful there, the next part of my plan was to purchase a used Canon 5D classic - but the mirror would hit the back of the lens, so I used a Dremel to grind the mirror. I swapped the focusing screen and wow, cheap full frame 50mm F1.2 for far less than Canon's 50mm F1.2L. My daughter was just a baby now, and I was getting some real keepers.

Manual focus is a different kind of beast - you have to learn tricks on how to focus. I'd practice with my daughter - She'd run and jump and I'd try to prefocus at a point and nail it. Sometimes, I'd focus on the ground where she'd be expected to cross, and as she got to that point, I'd time it and snap.

With the focus screen, and my then younger eyes, I still had a lot of missed focus shots - but they weren't bad. And upon nailing the focus just right, I'd be rewarded with the creamy goodness of that F1.2 f-stop. This is my little angel running towards me. This was shot wide open on the 5D, 1/100, ISO 800. Given that the 5D ISO got noisy above this, I was thankful for the fast lens.


Is this gear "pro" enough to be recommended in place of current gear? LOL NO... Not then, not now. This is an amateur's hobby gear. A fun experiment that occasionally gives astounding results. The 5d was perfect for me - the Canon EF mount was a few millimeters shallower than the Pentax K, M42, Leica R, Nikon, Contax Yashica, and Olympus OM mounts - So I was able to adapt most of my older DSLR glass to this amazing camera. Naturally, I'd be looking up the most common cheap fast lenses of all - 50mm glass. Back then I'd score F1.4 speeds for $30 off eBay or KEH. The price of those jewels has risen quite a bit, as the mirrorless crowd gobbled them up.

At ~2013, Metabones released their focal reducer - branded a "Speed Booster". Focal reducers weren't new - they were used in telescopes mostly but used between a mirrorless camera's sensor and DSLR's lens (designed to be far from the sensor for a mirror), suddenly crop sensor cameras were giving pictures more similar to larger sensors. It wasn't perfect, but the image brightness was noticeable, and the concentration of light did somewhat increase resolution. The result was 50mm, which had a field of view of a 35mm lens. An F1.8 captured light like an F1.3. An F1.4 was like an F1.0. An F1.2 was a blistering effective (theoretically) F0.86.

Clones followed. Focal reducers as I mentioned were used in telescopes before, so finding appropriate glass and fitting them into adapters was the next step for cheaper brands. Metabones sold their adapter for $600. Cheaper brands sold theirs for $70 on ebay. Guess which one I picked up.

I'm still using micro-four-thirds, but my Canon 5D is relegated to nostalgia. A Sony A7 is the current house "darling" delivering the creamy smoothness of a full frame with a resolution that leaves the Canon 5D behind. But... I still love my micro-four-thirds. It's so small... Not just cameras, but lenses, and thus necessary tripods, bags etc. I have so many 50mm lenses - and I jumped on a couple eBay deals to snag an old Metabones "Speed Booster" EF to MFT adapter, and Zhongyi "lens turbo II". Naturally, I had to test these lenses and adapters. Perhaps a lens may favor one or the other. Was the Metabones really that much better? I set up a quick test...


I aimed for the center of the larger chart, and went back enough to get the eye-chart at the edge.

What am I testing

There are 3 main speed boosters you can get today. Probably more - "Commlite" comes to mind, but it's likely they're using an existing lens design. Here are the speed boosters I have. Zhongyi Lens Turbo II, Metabones EF-M43 "smart" adapter (aperture control), and the Pixco "generic" speed booster. Do note that the "smart" feature of the Metabones Speed Booster works against adapted old lenses, shorting out the pins. I disabled my speed booster. All focal reducers here are EF mount - because so many other lens mounts work on EF.


Here's a look at the lenses I tested. I should probably weigh them. The Nikon 50mm F1.4 and Contax are the lightest here. The Canon 55mm F1.2 could possibly be weaponized against zombies.


A look at center sharpness


I'm not going to say which is best. Some of these are close enough to be subjective. You can see and judge what you like. 

Some notes though.
  • Minolta is off by itself since it cannot mount to Canon EF. That lens has its own Pixco adapter.
  • The Cheap $70 Pixco has nicer contrast and sharpness than the Zhongyi, although the Zhongyi lens turbo II is a little brighter. I'd recommend the Pixco based on that though.
  • Viltrox provides aperture control and autofocus. The image though is smeary Vaseline. 
  • All shots were done with a flash to keep exposure mostly constant. ISO 200, 1/160 shutter speed, and lenses were used wide open.
  • I think the Nikon 50mm F1.4 is quite good, being the "newest" of the vintage class. It's almost as bright as the 1.2s but has better contrast wide open. The Minolta is cheaper to obtain but not quite as sharp. 
  • The sharpest lens wide open is the Rokinon 50mm F1.4. The Zeiss is beautifully sharp too and the Takumar is spectacular given its age, but the Rokinon has truly impressed me here.
  • The SMC Takumar 50mm F1.4 yellowed with age. That's radioactive glass! It's beautiful and crisp - but darker than the F1.7 Zeiss Planar. I left it in the sun, with some foil under it to "cure" the yellowing (UV light). It did lighten up a lot before this test. I left it there for maybe 2 weeks. I think the dark effect of the glass diminishes the benefits of this fast lens.
  • The Canon 55mm F1.2 and Nikon 50mm F1.2 seem close. I snapped the tabs off the Nikon lenses so that I could use them on all the focal reducers. The Canon 55mm F1.2 SSC is spectacular on the Metabones adapter and is ahead of the Nikon 50mm F1.2 there. Strangely enough, I think the Nikon F1.2 does better on the Pixco adapter than the Canon. I've gone back and tried this several times. It really does seem that an adapter can work better with some lenses than others.
  • The Nikon 50mm F1.4 on Pixco looks really good - spectacular given the price.
  • The Rokinon has me absolutely floored. I really wasn't expecting it to blow me away. Online reviews generally paint it as "average". Not a bad lens - but in competition with modern brand specific 50mm F1.4s, it does not really stand out - while at the same time, lacking autofocus. Getting this used at a fraction of the cost ($334 from their site, <$200 used) provides a magnificent manual lens for use on a focal reducer.

What about the Edges?

NOTE: pending redo!

  • The Nikons seem to have the edge here on the Pixco and Zhongyi LensTurbo II, though the LensTurbo falls apart at the edges.
  • The Nikon 50mm F1.4 continues to impress on the cheap Pixco adapter. A good combination of contrast and clarity.
  • The biggest disappointment is the "modern" Canon 50mm F1.4 USM. That current lens just can't keep up with the Nikons.
  • The Zhongyi just isn't as nice a render as the Pixco. Given that the Pixco is a half to a third the price new, it just seems like a better buy.
  • Neither cheaper adapter can do the Canon 55mm F1.2 justice. The Metabones Speed Booster clearly shows superior contrast and brightness. 
  • I'm not investing in Canon EF gear, and the Canon 50mm F1.4 USM sucks using manual focus. Wide open it falls to the older Canon 55mm F1.2 SSC. Given that, and the fact that my Panasonic G9 would error out with vintage glass attached shorting the Metabones "smart" adapter pins, I disabled it. I opened the Metabones and cut the ribbon cable. Now there are no more errors and problems with vintage glass.
  • I'd say the Metabones Speed Booster is worth it if you still like vintage lenses and want the most out of them. Just use eBay and hunt. I'd be very satisfied with the Pixco-generic if the only available Metabones Speed Booster was $600 (current cost).
  • I might try cutting the protrusion off the Nikon lenses so that I can run them on the Metabones and see how they perform there.

Other aspects of the lenses are also relevant!

  • A lens could be sharp, but also difficult to focus. I don't think the Modern Canon 50mm F1.4 USM is bad. But it's not great, and manually focusing it is compounded by the sticky, rough focus action.
  • Focus action on the Canon 55mm F1.2 is butter smooth, and long. It's easier to move past focus and move back to where you saw focus peak. the Takumar is also great for this. It's a pleasure to use. the Contax Yashica Zeiss is also nice. Not as smooth and damped, but still a pleasure to use. 
  • The Nikon focus action isn't nearly so nice and damped. It's not nearly as rough as the modern Canon 50 USM, but I'm surprised it's not smoother.
  • The Canon 55mm F1.2 SSC is an FD mount. This predates EF and is not adaptable. I found a mount replacement (EdMika) that replaced the FD bayonet mount with a brass EF mount. This makes this a one-of-a-kind lens.
  • The Nikon 50mm F1.4 can go from $75-$100 on eBay. The Pixco adapter is ~$70. You can end up with a $160 35mm F1.0 with this combination. An impressively low price for the speed and quality.
  • The Rokinon is a beautifully made lens - but it's large. It's larger than the Canon 55mm F1.2 FD, and the Canon 50mm F1.2 USM. The focus is nice and damped, with just the right length of throw. It's not metal, but decent-quality plastic. If this were metal, I doubt it would be affordable.

How they look on M43 cameras

The Panasonic G9 is my current "main". In this picture, the Metabones + Canon 55mm F1.2 is mounted to it. The Olympus E-M10 II is my backup. I've put the Nikon 50mm F1.4 and Pixco adapter on that one.


Here we can see my current favorite - The Rokinon+Metabones on the G9. An old GX1 wth the Pixco+Zeiss 50mm F1.7, and an ancient E-P3 with the Pixco+Minolta 50 F1.4.


Todo:

  • Attempt to put the Nikon lenses on the Metabones adapter - it deserves a try 😁
  • Go out and have fun with the Canon 55mm F1.2/Speed Booster. 👍
  • update: Nikons tested! Broke tabs off with pliers. Pretty sharp, but lacks contrast on Metabones wide open. Have to update the images.
  • Have to test bokeh smoothness and flare. That may be interesting ;)


Thursday, May 11, 2023

Don't toss broken electronics. They're often easier to fix than you'd expect.

 I tried turning on my Blu-ray player recently only to discover the device was powerless. Neither did LED lights flicker nor did the disc tray eject.

This wasn't the first bit of household electronics I've had to fix. A lot of stuff is modular these days. Usually, it comes down to replacing a board. for power, process, or display. I've been able to fix a couple TVs and my oven this way. 4k Blu-ray players are still expensive so, it's good savings buying a replacement module vs buying a completely new Blu-ray player.

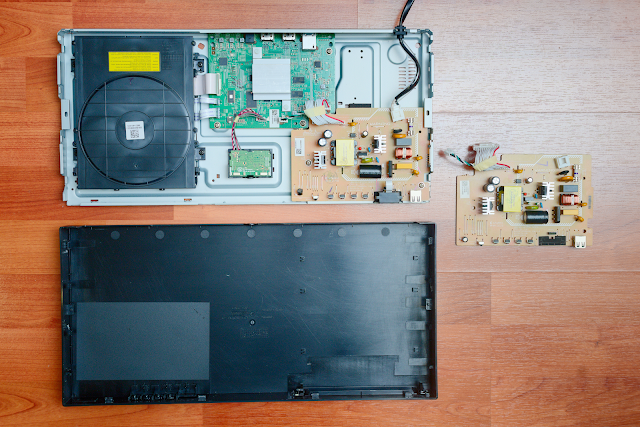
Looking at the way my Bluray player responded, it appears to be a power issue - so a power module board is a likely culprit.


Looking at the device opened up - There are only a couple of boards. the power cable plugs into the brown power module. The green board drives the disc.

Ok - so if we need a brown power board, how do we get one?

Most module boards will have a serial number (or a few). Just search for them.

e.g.


Other possible search strings may be the model of the device and "control board", "motherboard", "power board" or "daughter board".

A little looking around and you may be rewarded with the part you need. Ebay is another good place to look for modules by serial number.


This was unplugged of course, but I did make sure to short out the terminals of the big capacitor before unscrewing this. A screwdriver was all I needed to get this out. The cables plug in only one way, so there's no worry about plugging this back in wrong. A few minutes later, this was powering back up.

Board cost  = $65
Device cost = $300
Money saved = $235
Awesome points gained = $...¯\_(ツ)_/¯


Tuesday, January 24, 2023

I made a joystick. i.e. Why pay $X for something you can spend $(X+Y) building ¯\_(ツ)_/¯

I Made A Joystick.

    I was playing Microsoft Flight Simulator - gorgeous graphics! - and amidst the splendor of... someplace I've never been, I found myself wanting more physical controls. I have a nice joystick - A VKB Gladiator. It even has a little throttle. That's the only analog control other than the stick though. It's far from bad, but I just felt like trying more...


    The first place I checked was amazon. The Thrustmaster TCA "Airbus" controller caught my eye. It was expandable to 4 levers, and there was even a sale. So I bought it...
    Then I thought about checking Reddit. it's not a bad controller, but there was a lot of love for the pricier fare. Of course, I then stumble onto threads of homemade joysticks. "Yeah... I can do that..." I thought - and off I dove into Amazon again, canceling my order, and getting a project box, various switches, wires, and an Arduino Leonardo.


Are you board?

    It should be noted that not every Arduino board can work in a joystick project (at least, not normally to my knowledge). The Leonardo can, and there are a few libraries that will work with it. 

    That takes care of me telling the computer what to do - "button 5 is pressed", or "set that much throttle". Now I need to figure out how to put together the physical switches, potentiometers etc and read them in.


Building!

    I started with the project box - cutting holes for the switches - and a couple radio-control replacement sticks. These are modular joysticks for use in radio-control transmitters - like the type you'd control a model airplane with.

    This simplified the project - I didn't have to develop a gimbal. This has it all built in. It's small - a thumb stick - but this is fine for at least version 1 right?
    NB: looks like there are nicer stick modules about too. "FrSky" has an all-aluminum hall sensor model. Version 2? 😀


    I used sticker paper with a cutout to get the holes right before applying it to the inside of the project box, and using my scroll saw to cut the larger holes and slider-hole. The smaller holes were simply drilled. The texture of the box is the same as my last headset - Rhino-liner.


    Measure twice, and cut once. With the holes cut, everything fit quite nicely. Rhinoliner did get pretty scratched while bolting in the buttons so I make another pass with a touch of bronze.


    The underside of the panel looked like it provided plenty of room - Piece of cake right? (The cake is a lie!)
    Meanwhile, I'm messing with the Arduino code, trying to see what it will take to read the values correctly.


    I've got 16 buttons (6 up-down toggle + 4 regular) - I don't think I had enough pins - so the alternative, is to use 8 pins in a 4x4 grid. Loop through one row of pins sending a signal, then check each pin in the column for a response. If it's there, the button is on. Throw in a diode, and you can press multiple buttons without issue.


I ain't 'fraid of no ghosting...


    Turns out you cannot assume an input pin is going to be high or low - it should be pulled to that point - or else you can expect some garbage. Arduino has an input mode for this - "INPUT_PULLUP".
    
    From the grid above, pins 1-4 are read. Pins A-D are scanned.

    So I'm taking "HIGH" as normal (not pressed). If I press a button that closes a switch - say at "C-2" in the diagram, then as I scan the pins - set "C" to low, then read 1-4 - pin 2 will register low, button press. When done with scanning for "C", set "C" again to high.

    The diode setup prevents ghosting - you can smush a bunch of buttons and only those buttons show up as pressed. Without the diode, singular button presses are fine - but if I were to press A1, A2 and B1 - then B2 will show up as pressed as well.


So... many... wires...

Gaaahhh!!


    The most annoying bit of this was soldering all the wires in place. The board needed several wires to act as rows and columns. 4 wires for reading, 4 for the scan, and 32 for 16 buttons. Wires tend to come joined - Joined wires appear to put a lot of stress on the shorter wire. I had to resolder a few that pulled away from the board.


    Soldering the wires to the buttons after that was no picnic either!


    I thought I had enough space - really. 


    I had to get creative, bending the headers on the Arduino board a bit. Heatshrink was getting in the way, so I went with masking tape and tucked those wires above one of the stick modules. Not the best, but it will do.


    Yay - we have a pulse!


It doesn't look much different, but it's got a brain now! I've tried it in MS Flight Simulator, and Superflight. I still need to try it in Kerbal Space Program 😀.


Code:

#include "Joystick.h"

Joystick_ Joystick(JOYSTICK_DEFAULT_REPORT_ID, JOYSTICK_TYPE_JOYSTICK, 16, 0,
   true,  true,  true, false, false, false,  true, true, false, false, false);
//    X,     Y,     Z,    RX,    RY,    RZ,  rudr, throt, accel, brake, steer);


#define JOYAX1_PIN  A1 // Arduino pin connected to VRX pin
#define JOYAX2_PIN  A2 // Arduino pin connected to VRY pin
#define JOYAX3_PIN  A4 // Arduino pin connected to VRY pin
#define JOYAX4_PIN  A3 // Arduino pin connected to VRY pin
#define JOYAX5_PIN  A0 // Arduino pin connected to VRY pin
#define HIGHPIN 13
#define CHKPIN 12

#define buttchanA 2
#define buttchanB 3
#define buttchanC 4
#define buttchanD 5

#define buttreadA 8
#define buttreadB 9
#define buttreadC 7
#define buttreadD 6

int ButtonState[16] = {0,0,0,0,0,0,0,0,0,0,0,0,0,0,0,0};

int reRange(int inval, int inmin, int inmax, int neg){
  int range=inmax-inmin;
  float oldval=inval;
  int newval=(((oldval-inmin)*1023)/range);
  newval=min(newval,1023);
  newval=max(newval,0);
  if (neg<0) {
    newval=1023-newval;
  }
  return int(newval);
}

void setup() {
  //Serial.begin(9600);
  pinMode(JOYAX1_PIN, INPUT_PULLUP);
  pinMode(JOYAX2_PIN, INPUT_PULLUP);
  pinMode(JOYAX3_PIN, INPUT_PULLUP);
  pinMode(JOYAX4_PIN, INPUT_PULLUP);
  pinMode(JOYAX5_PIN, INPUT_PULLUP);
 
  pinMode(HIGHPIN, OUTPUT);
  digitalWrite(HIGHPIN, HIGH);
  pinMode(buttchanA, OUTPUT);
  pinMode(buttchanB, OUTPUT);
  pinMode(buttchanC, OUTPUT);
  pinMode(buttchanD, OUTPUT);
  digitalWrite(buttchanA, HIGH);
  digitalWrite(buttchanB, HIGH);
  digitalWrite(buttchanC, HIGH);
  digitalWrite(buttchanD, HIGH);
  pinMode(buttreadA, INPUT_PULLUP);
  pinMode(buttreadB, INPUT_PULLUP);
  pinMode(buttreadC, INPUT_PULLUP);
  pinMode(buttreadD, INPUT_PULLUP);
  pinMode(CHKPIN, INPUT);
  Joystick.begin();
}

void loop() {
  int joy_ax1_val = analogRead(JOYAX1_PIN); // X axis, right stick regx
  int joy_ax2_val = analogRead(JOYAX2_PIN); // y axis, right stick regy
  int joy_ax3_val = analogRead(JOYAX3_PIN); // X axis, right stick rudder
  int joy_ax4_val = analogRead(JOYAX4_PIN); // Y axis, right stick throttle
  int joy_ax5_val = analogRead(JOYAX5_PIN); // Z axis, slider for trim              

  int pinW;
  int pinR;
  for (int idxW = 0; idxW < 4; idxW++){
    if (idxW == 0) {pinW=buttchanA;}
    if (idxW == 1) {pinW=buttchanB;}
    if (idxW == 2) {pinW=buttchanC;}
    if (idxW == 3) {pinW=buttchanD;}
    digitalWrite(pinW, LOW);
    for (int idxR = 0; idxR < 4; idxR++){
      if (idxR == 0) {pinR=buttreadA;}
      if (idxR == 1) {pinR=buttreadB;}
      if (idxR == 2) {pinR=buttreadC;}
      if (idxR == 3) {pinR=buttreadD;}
      int ChkButtonState=!digitalRead(pinR);
      int butnum=(idxW*4)+idxR;
      if (ChkButtonState != ButtonState[butnum]){
        Joystick.setButton(butnum, ChkButtonState);
        ButtonState[butnum] = ChkButtonState;
      }
    }
    digitalWrite(pinW, HIGH);
  }

  joy_ax1_val=reRange(joy_ax1_val,92,977,1);
  joy_ax2_val=reRange(joy_ax2_val,64,928,1);
  joy_ax3_val=reRange(joy_ax3_val,88,985,1);
  joy_ax4_val=reRange(joy_ax4_val,47,920,-1);
  joy_ax5_val=reRange(joy_ax5_val,15,1023,-1);
  /*Serial.println( String(joy_ax1_val)+" "+
                  String(joy_ax2_val)+" "+
                  String(joy_ax3_val)+" "+
                  String(joy_ax4_val)+" "+
                  String(joy_ax5_val)+" ");
  */
  Joystick.setXAxis(joy_ax1_val);
  Joystick.setYAxis(joy_ax2_val);
  Joystick.setRudder(joy_ax3_val);
  Joystick.setThrottle(joy_ax4_val);
  Joystick.setZAxis(joy_ax5_val);

  if (digitalRead(CHKPIN) == LOW){
    Joystick.end();
  }
  delay(5);
}


    Ignore the "HIGHPIN" and "CHKPIN" - those were there for troubleshooting. The "reRange" function may stand out as odd. The purpose of that is to calibrate the analog axis somewhat. It's not handling centering really, but it will invert an axis if needed and spread the values it does read from 0-1023. 
    e.g. A stick may read from 90-950, instead of the expected 0-1023. Taking the read value, subtracting the minimum value, then multiplying by the range I want (1023), and dividing by the range I have (950-90) gives me an effective 0-1023 analog control. 


    I'm pleased with how this turned out. It matches my headset - version 11 🎧. Two 40mm drivers in each ear, David Clark headband... The headphone builds improved with each version. Perhaps this would apply to the controller as well? 😁